Making an Oil-Based Propolis Extract at Home
Oil-based propolis extract is a great alternative for those who prefer not to use alcohol-based tinctures. This type of extract on its own can be used both topically and internally, depending on the oil. It can further be use to make propolis salve by mixing it with beeswax and essential oils.
The process involves infusing propolis into a carrier oil, which extracts the beneficial compounds (the same principal can also be used to make propolis ghee butter). Here’s how to do it at home:
Best Oils to Use
- Olive Oil: A popular choice due to its stability, rich nutrient profile, and mild flavor. Olive oil is excellent for both internal and external use.
- Coconut Oil: Known for its antimicrobial properties and solid state at room temperature, making it ideal for creating a salve-like product. It’s also great for skin applications.
- Sunflower Oil: A light, non-greasy option that is rich in vitamin E. It’s good for both internal consumption and as a skin moisturiser.
- Almond Oil: Rich in vitamins E and D, it’s a great option for skincare products.
- Jojoba Oil: Though technically a wax, it closely resembles the skin’s natural oils and is excellent for topical applications.
Materials Needed for ~11% extract
- Raw Propolis (cleaned): 1 part, for example, we use 28 g
2. Carrier Oil: 8 parts, for example, we use 224 ml of olive oil
3. Vodka 40 % : 14 ml (to help extraction process and better preservation)
4. Pot
5. Heat-Resistant Glass Jar with a Lid
6. Small Towel
7. Amber Glass Jar with Lid (for storage), we use 3 jars 60 ml each
8. Cheesecloth or Fine Mesh Strainer
9. Kitchen Hammer (for crushing the propolis, optional if you use cleaned propolis)
10. Measuring Cup
11. Electronic Scales
12. Wooden skewer (for stirring propolis and oil mix)
13. Kitchen thermometer and some paper towel (to wipe skewer and thermometer)
Step-by-Step Recipe
Step # 1: Prepare the Propolis
- Freeze and Crush the Propolis: place the propolis in the freezer for a few hours to make it brittle. Then, put it in a piece of cheesecloth and crush it into fine bits using a kitchen hammer. This increases the surface area, making it easier to infuse the oil. This step is optional if you use already cleaned propolis.
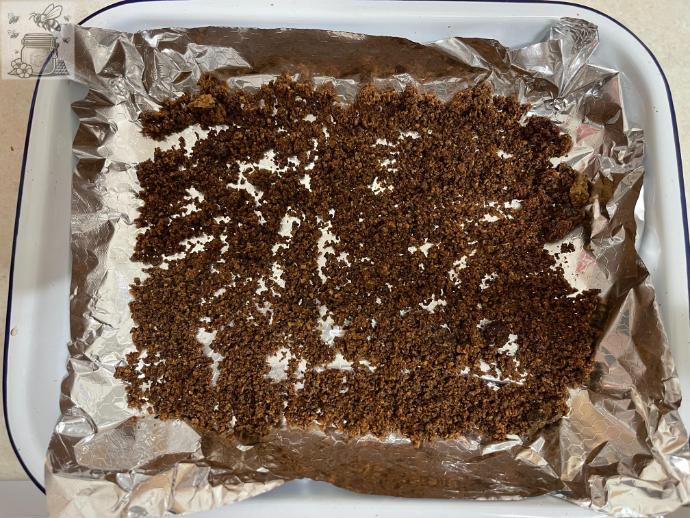
In the photo you can see cleaned and air dried propolis: it is very crumbly and the pieces are small enough to use as it is.
Cleaned propolis can be stored like this in the freezer (wrapped in foil or placed in a small clear bag or plastic/ glass container). It can be crushed even further into finer pieces if you wish to do so.
2. Mix Propolis and Vodka: to help preserving the extract/ salve and to help the extraction of propolis, put the propolis into a glass jar, add 14 ml of vodka (40 %), mix, close the lid and leave overnight.
Step # 2: Set Up Pot using Double Boiler principle
Prepare the Pot: cover the bottom of a pot with a small towel, pour water into the pot so that it will be above the level of the propolis and oil mix in the jar.

← Add carrier oil to the jar with propolis and vodka mix, stir well, place the jar on the towel in the pot.
This is what the oil and propolis mixture will look like after you stir it in the glass jar. →


Close the glass jar with the lid and put on the towel in your pot with water. Put it on the cooker and start heating.
To speed up the process you can cover the pot with a lid. In the photo you can see a baking sheet covering a stainless steel jam pan, which is also a good option.
Keep an eye on it, stir the water occasionally to heat evenly. Check the water temperature regularly: when it reaches about 50°C (122°F), the oil and propolis mix will be a couple of degrees cooler.

Remove the lid from the pot, turn the heat down, open the lid on the glass jar, stir the mixture with a skewer and check the temperature: it should not exceed 50°C (122°F).
Tip: Wipe the thermometer each time you use it — so that after taking the water temperature you do not put any water into the oil when checking its temperature, and vice versa.
Close the lid on the glass jar and continue heating.
Step # 3: Infuse the Oil
Heat Gently: warm the mixture over low heat, keeping the temperature below 50°C (122°F).

This ensures that the beneficial compounds in the propolis are not degraded by heat.
Allow the mixture to infuse for 2 to 3 hours, stirring occasionally with a wooden skewer.
Step # 4: Strain the Mixture
Cool the Mixture first.
After the infusion period, remove the mixture from the heat and allow it to cool to room temperature.
The beneficial components of propolis has now been extracted into the oil.
All is left is to separate the sediment.

Strain: wipe the jars with a piece of tissue or kitchen towel and vodka to sterilise them.

Pour the mixture through a cheesecloth or fine mesh strainer into the clean dry amber jars and close the lids.
The dark glass helps protect the extract from light, which can degrade its potency.
Step # 5: Store the Oil-Based Propolis Extract
Label and Store: label the bottles with the date and contents. Store the oil-based propolis extract in a cool, dark place. It can last for up to a year when properly stored.
Tip: before washing anything used, in order to avoid any risk of blocking the sink, wipe all the residual substance from inside the glass jar and the sieve with paper towel, and bin it. Remember that propolis resin is sticky.
Usage
- Topical Use: Apply directly to the skin to help with wounds, burns, rashes, or other skin conditions.
- Internal Use: Take 1-2 teaspoons daily to boost immunity and support overall health.
- Salve Base: Mix the propolis oil with beeswax to create a healing salve.
Tips:
- Oil Selection: Choose an oil based on your intended use. Olive oil is excellent for most purposes, while coconut oil is ideal for skin applications. You can even mix different oils to create a custom blend.
- Low-Temperature Infusion: Keeping the temperature below 50°C ensures that the bioactive compounds in propolis are preserved.
- Healing Salve: propolis oil extract can be used as salve as such, however as an option you can add beeswax and essential oils to it to further enhance the extract. (It is wise to test a small patch on your skin before using your salve.)
- You can also make ghee butter with propolis, which has its own wide range of benefits.
Step-by-Step Guide to Making Enhanced Propolis Salve
You’ll need beeswax and optional essential oils.
Beeswax will help further solidify the salve. Aim for organic, unbleached beeswax. It generally comes in small pellets or blocks. Use your own clean wax if you are a beekeeper.
Essential oils aren’t required but can enhance your salve. Lavender, eucalyptus, and tea tree oils are excellent for their added healing properties and fragrance. Just a few drops suffice.
The proportions are:
- 1 part propolis,
- 1 part beeswax,
- 6 parts carrier oil.
For example, if you use 20 grams of propolis, you’ll need 20 grams of beeswax and 120 grams of your chosen carrier oil.
# 1 Follow Step 1 to 3 of the Oil-based Propolis Extract Recipe above.
# 2 In Step 4 at the end of the infusion period add beeswax in small pieces (that will help to melt beeswax evenly and quickly). Stir continuously until the beeswax is fully incorporated. This step requires some patience, but smooth mixing ensures a consistent salve.
If using essential oils, add a few drops once everything is combined. Stir well so the oils are evenly distributed. Remember, a little goes a long way with these potent oils.
Pour the mixture through a strain or fine mesh into small containers while it’s still warm and liquid. Glass jars or metal tins are ideal. Wipe them with alcohol to sterilise beforehand. Allow the salve to cool and solidify at room temperature. This transition usually takes a few hours.
Storing your propolis salve properly can extend its shelf life. Keep it in a cool, dark place to maintain its efficacy. It can last up to a year when stored correctly.
For those looking to experiment, there are plenty of creative variations. Adding other oils like calendula or chamomile can enhance healing properties. Playing with different carrier oils also changes the texture and benefits of your salve.
Thank you for reading, and let me know if you have questions or suggestions.