Here are my practical steps for anyone wondering how to start a beehive? There are a few obvious things that one would need: a beehive, honey bees and beekeeper’s tools and equipment.
Choosing Your Hive
There are a few types of beehives. I will dedicate a separate post to describing and comparing them. The good thing — you do NOT need to know all that to start a beehive.
My choice was determined by my mentor, who had 3 Langstroth hives and who had begun feeling difficult to manage them all due to his old age. He offered me to purchase 1 of his hives which was excellent because at once I got a complete cedar hive set consisting of:
- a brood box,
- 2 supers,
- an open mesh floor with a varroa board and an entrance block,
- a crown board,
- a roof.
Plus, an overwintered bee colony.
Up to today I am still very happy with this type of beehive and would highly recommend it. There are 2 options: an 8-frame Langstroth hive and a 10-frame Langstroth hive. I have got and tried both and I actually like both options. My first hive was for 8 frames, and I had a strong and flourishing colony there. A 10-frame hive provides more space but it is noticeably heavier if you were to move it.
Handy tip: it is best to choose your type of hive from the start and stick to it as you will be able to use interchangeably parts for all your hives in future. Even if you have only 2 or 3 hives, it is easy when all parts are compatible.
What Should Be Ready Before Your Bees Are Delivered
It was the beginning of March when my mentor, who lived just 15 minutes’ drive away, brought the bees straight to my garden. By the delivery day I had:
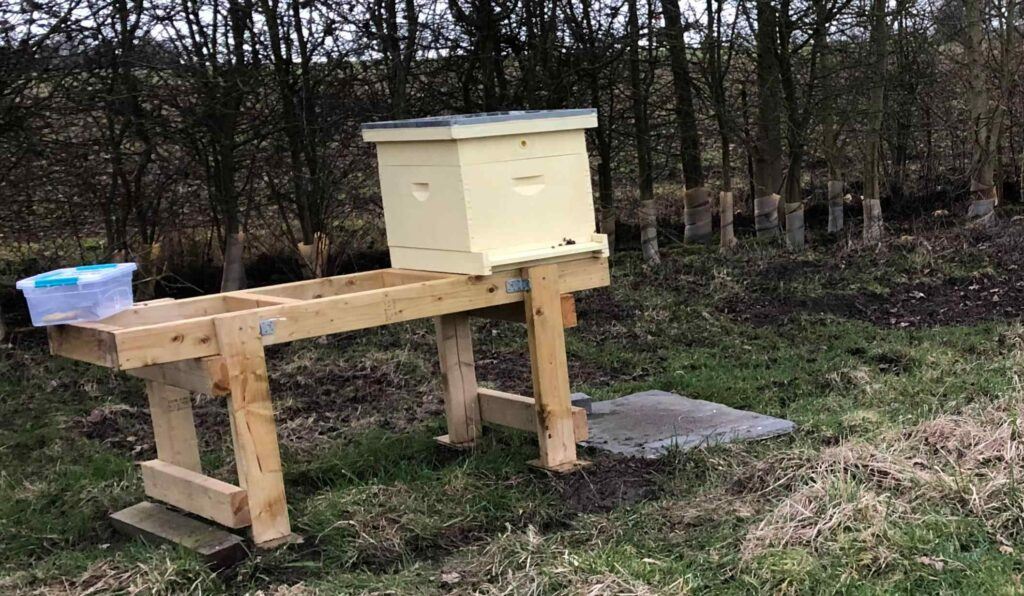
- prepared a place,
- had a stand made,
- cleaned the purchased hive with a blow torch (which I had to purchase),
- purchased 2,5 kg of candy pollen bee feed (as my bee colony was not big yet), frames and foundation for a brood box and 2 supers,
- purchased a beekeeper’s suit, 2 pairs of rubber gloves, a J hive tool (for lifting and scraping), a hive tool for prying, and a smoker (now I use it very seldom, and when I do, I use small egg boxes for burning), a plastic container for cleaning hive tools, soda crystals, metallic sponge.
Best Place To Put A Hive
Before getting my first hive, I had asked to visit a couple of small apiaries to see what other beekeepers found useful and convenient. And I would mention the following:
- the hive should be protected from strong winds, so placing it next to a shed (though rain falling from the roof edge straight on the hive roof is not very good, if this is the case it may need some adjustments), a fence or a hedge would work quite well,
- not being in the blazing sun all day also seems to help bees maintain the right temperature in the hive,
- a good access for inspecting the hive: I should have enough space on one side of the hive and at the back so that I could easily insert and take out a varroa board when I need to,
- the surface on which the hive stands should be flat, the hive should stand firmy without tipping to a side or wobbling,
- the hive should be on a stand, approximately 18 inches/45 cm high from the ground.
Do I Need A Stand For My Hive?
I would strongly recommend a stand for a beehive. The main reasons are:
- it helps bees to protect their hive from damp ground, moisture related issues and predators,
- if there is some grass or anything else grows around the hive, it is easier for bees to get to the entrance of their hive,
- it is so much more convenient for a beekeeper when the hive is on a stand — it just saves your back from excessive bending when you are inspecting your hive or doing other manipulations.
In fact, I find it so convenient that I have a spare single stand which I leave in my apiary all year round. I place it behind the hive I am inspecting or splitting, or doing something else, and use it to put things on it.
Is it better to buy or to make a stand for a hive?
It does not really matter. Buying a stand is easy, and you can decide what adjustments, if any, you would like to make. I actually assembled all my stands which were pre-sawn to the right sizes: 2 stands for a single hive and 3 double stands. If there is enough space, a double stand is brilliant.
Where To Get Bees
- From a hobbyist beekeeper
I have heard and read that buying from a hobbyist beekeeper down the road is not a good idea. I think it depends. I got my first hive and one more bee colony the following year from my mentor and a hobbyist beekeeper who is very enthusiastic about bees. There was nothing wrong with them. Bees are quite expensive to buy from a beekeeping business. But visiting and joining a local beekeepers’ association or group can help. Maybe somebody has got too many hives and would be happy to sell you a bee colony or the whole hive with bees, like my mentor.
2. From a beekeeping business
Buying from a reputable apiary is more expensive but definitely worth consideration. They usually provide options: a package of bees (which is like a man made swarm, no frames) or a nucleolus colony (a ‘nuc’, bees are supplied on 3-5 frames of drawn comb already filled with brood, honey and pollen). For a beginner I would recommend a nuc as it would be easier.
Handy tip: in both cases it is easier if the frames fit YOUR hive: if you already have a Langstroth hive, than it is best to get a Langstroth nuc. While still being a total beginner, I happened to get a nuc on National frames, which are shorter than my Langstroth frames. They were extended but the constant comb on the sides made my inspections less easy both for me and my bees.
3. Catching a Swarm
A swarm is free bees 🙂 but I would say that for a beginner it is the least suitable option as it requires some practice of actually handling bees. However, being present while a swarm is being collected by an experienced beekeeper is valuable. That certainly gave me confidence to collect swarms later.
I was also offered a swarm by another hobbyist beekeeper, but it was quite small and unfortunately, despite my efforts, never grew into a prosperous colony. However, during my third or fourth year of beekeeping I collected a huge spring swarm that absolutely flourished and by the end of summer brought me a whole super of honey.
Transporting Your Buzzing Colony
I have transported bees both in a nuc box and in beehives simply in the boot of my car.
I was driving carefully and avoided unnecessary breaking and sharp acceleration.
I was wearing my beekeeper’s suit — one can never be too careful.
For picking up a swarm from another beekeeper I used a Correx nuc box, which is perfect for transporting bees: it has tabs to lock the lid in place, it is ventilated, it accommodates 5 frames, so when they are all in place, the frames are secure, they do not move and damage bees.
This is my Correx nuc box.
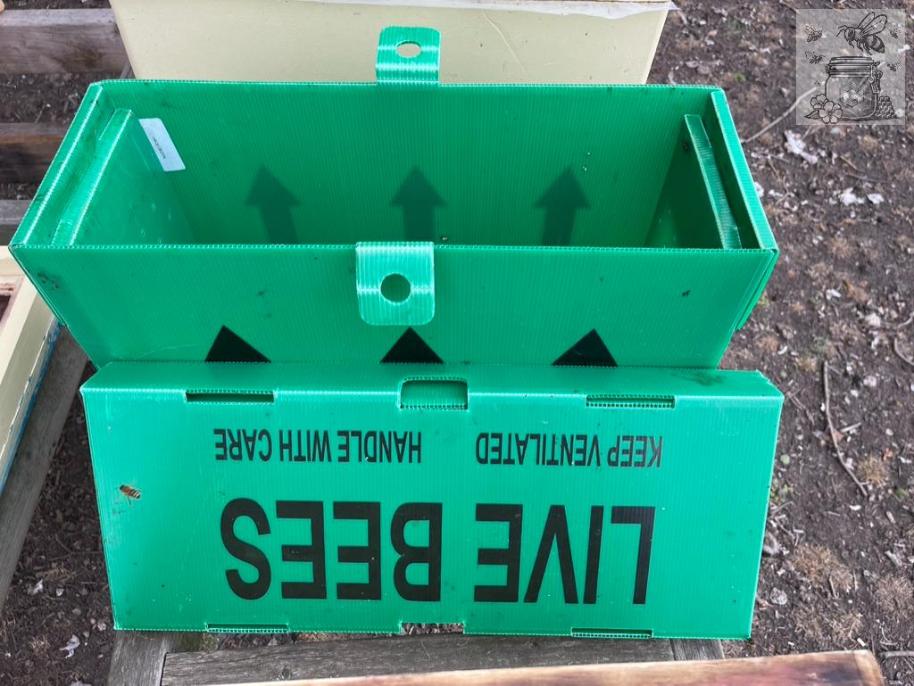
In this photo I used it to move a swarm collected near my house. The nuc box comes flat with detailed instructions on how to assemble it, it is very easy.
When I moved my apiary to a new place, I secured each hive carefully late in the evening, after all my bees had already settled in the hive for the night. First I closed and secured the entrance, then I removed the roof and secured each hive with an extra durable tape, and then placed the roof on top. I drove the hives in the dark and left them in their new place till the morning. Bees need ventilation for oxygen. I used open mesh floors, so my bees were comfortable.
The Excitement of Having a Hive
Now that all the preparation work has been done, it is perfect time to just enjoy watching the bees for some time while they are settling down in their new home, and also to look forward to getting to know those remarkable creatures better.
Hey, I enjoyed reading your posts! You have great ideas.
Hello, thank you for your positive comment, I am very much in the beekeeping process currently as the summer has been quite a challenge here in the UK. New things (and there are always something new and unexpected with bees) have cropped up, I will be posting all that later, including the way I have been dealing with them. Thanks again!